
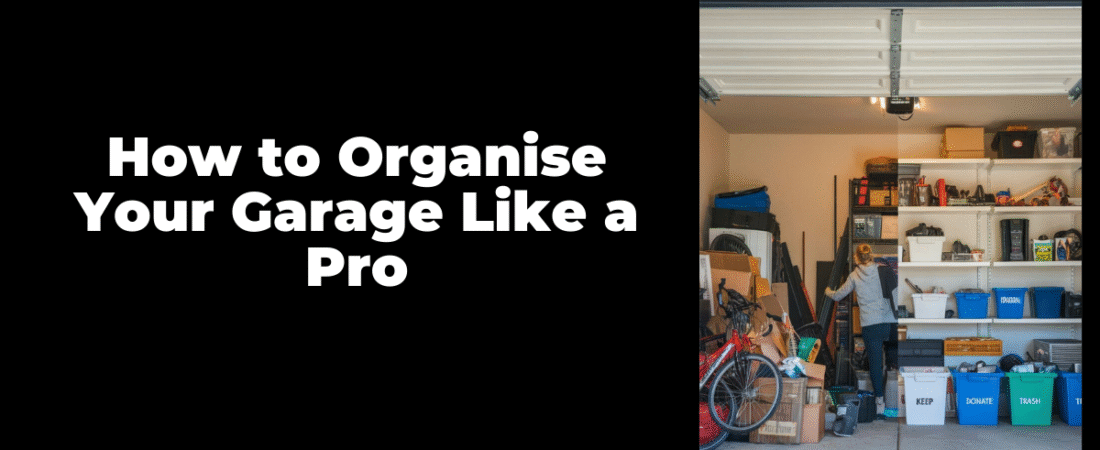
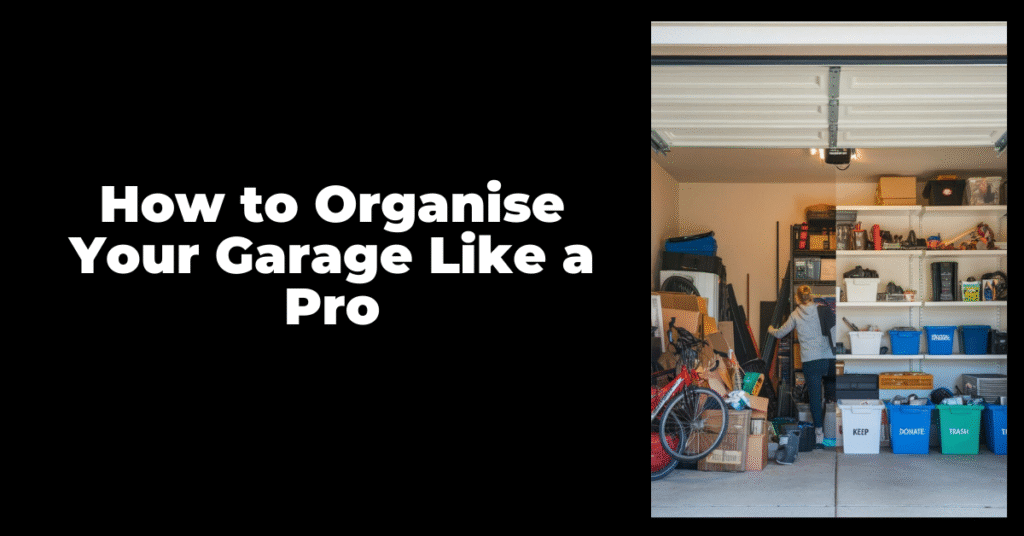
I remembered the garage as the place where decisions went to hide. Boxes stacked, tools wandered, and the floor became a narrow path between forgotten things. The air smelled like dust and old cardboard, and the light always felt slightly dim. One weekend I finally cleared a corner, then another, and the space started to feel like part of the home again. Organising a garage like a pro did not require perfection, but it did require a plan that respected how people actually lived. This guide shared that plan in a simple order that kept the progress real.
Quick Answer / Summary Box
A pro-level garage organisation system started with sorting and zoning. I removed everything, grouped items by category, and created clear zones for parking, tools, sports, storage, and seasonal items. I used vertical storage, labelled bins, and sturdy shelving, then I kept pathways open for safety. I stored heavy items low and frequently used items at eye level. A short weekly reset kept the system working without stress.
Optional Table of Contents
This guide explained what professional garage organisation meant and why it mattered. It then walked through a practical step-by-step method you could follow in one or two sessions. It covered the best tools and options for storage, including budget and premium setups. It included examples, a checklist, and a mini case-style plan for a typical garage. It finished with mistakes to avoid, short FAQs, a trust section, and a clear conclusion.
H2: What it is (and why it matters)
Organising a garage like a pro meant the space worked first, and looked good second. It meant every category had a home, and the floor stayed mostly clear for movement. It also meant the layout matched habits, not wishes, which was the part people skipped. This mattered because garages often became the default storage room, and that slowly created stress, wasted time, and safety risks. When the garage became organised, it supported daily life quietly, and it stopped draining energy in the background.
H2: How to do it (step-by-step)
I treated the garage like a small project, not a sudden miracle. I started by planning zones on paper, then I cleared space to work safely. I sorted everything by category, then made decisions with a calm rule: keep what I used, donate what still helped someone, and discard what was broken or unsafe. I cleaned surfaces and marked the floor area for parking and walking paths. I installed storage in a logical order, then returned items with labels and clear access. The garage felt lighter because every step built toward a specific system.
H2: Best methods / tools / options
The best method depended on the garage size and the kind of stuff inside it. Heavy-duty metal shelving handled boxes and paint better than weak plastic, and it lasted longer in humid weather. Clear bins helped visibility, but opaque bins looked calmer for seasonal overflow, so I mixed both, in a practical way. Wall-mounted rails, pegboards, and hooks created vertical storage, and that freed the floor quickly. Overhead racks worked for lightweight seasonal items, though installation required careful measuring and secure anchors. A label maker helped, but simple masking tape and a marker still worked when the system stayed consistent.
H2: Examples / templates / checklist
I used a checklist that kept me focused when the mess felt overwhelming. I listed categories first, then zones, then storage needs, and only then did I buy shelves or bins. My checklist read like this: empty, sort, decide, clean, zone, install, return, label, and maintain. I also used a simple template for zone planning: left wall for tools and garden, back wall for storage and seasonal, right wall for sports and bikes, and the center for parking and walking. The plan changed depending on the garage shape, but the logic stayed steady.
H2: How to Organise Your Garage Like a Pro
I organised the garage in a way that felt like professional workflow. I used zones like a workshop did. I used labels like a small warehouse did. The garage stopped feeling like a dumping ground and started feeling like a calm, useful room. These steps explained how that shift happened.
Step 1: Pick a realistic time window
I chose a day with stable weather. Heat made the work feel heavier and slower. I planned for two sessions if needed, because rushing caused messy decisions. I kept water nearby and took short breaks, and the pace stayed steady.
Step 2: Clear the floor and create a working area
I moved everything out onto a driveway or a tarp area. I kept a clear path for safety and comfort. The empty floor showed the true size of the garage. That moment felt slightly shocking, but also hopeful.
Step 3: Sort into clear categories first
I grouped items into categories like tools, garden, sports, car care, paint, electrical, camping, and seasonal. I avoided sorting into “miscellaneous” too early, because that pile became a trap. I used cardboard boxes as temporary category bins. The piles looked chaotic at first, yet they created clarity fast.
Step 4: Make keep, donate, and discard decisions calmly
I checked each category and piled one item at a time. I kept items I used or planned to use soon. I donated duplicates and items in good condition that no longer fit my life, even if it felt sentimental. I discarded broken items and unsafe chemicals carefully, and I felt relief after.
Step 5: Clean the garage before putting anything back
I swept the floor thoroughly. I wiped cobwebs from corners and cleaned shelves if they existed. I opened the door for airflow, and the dusty smell faded. A clean base made the organisation feel more permanent.
Step 6: Map zones based on frequency and weight
I marked a parking zone and a walking path first. I placed high-use zones near the door, like daily tools and sports gear. I placed seasonal items toward the back or overhead. I planned heavy storage low and stable, because safety mattered more than style.
Step 7: Install shelving before bins and labels
Shelving created structure quickly. I placed shelves along a wall with enough clearance for car doors and movement. I used sturdy units for heavy boxes and car fluids. I left a little gap behind shelves for airflow, which helped in damp garages.
Step 8: Use wall space for tools and awkward gear
I mounted hooks for ladders, rakes, and hoses. I used a pegboard or rail system for hand tools. I grouped tools by task, not by brand, and that saved time later. The wall looked cleaner and the floor opened up immediately.
Step 9: Add overhead storage for seasonal light items
I used overhead racks for holiday decorations, empty suitcases, and seasonal sports items. I avoided putting heavy bins overhead, because that felt unsafe. I labeled overhead bins clearly so nothing became a mystery. The ceiling space worked hard once it had a plan.
Step 10: Choose bins that matched the garage environment
Heat and moisture damaged weak plastic. I chose durable bins with tight lids for long-term storage. I used clear bins for items I needed to identify fast, like cables and spare parts. I used opaque bins for messy items, like old rags, to keep visual calm.
Step 11: Label everything with plain, readable names
Labels needed to be obvious, not clever. I wrote “Car Care,” “Camping,” “Paint,” and “Seasonal Decor,” in big letters. I labelled two sides of each bin for visibility. The system stayed easier when labels stayed boring and consistent.
Step 12: Store chemicals safely and separately
I kept paint, solvents, and cleaners in a dedicated bin or cabinet. I stored them away from heat sources. I checked the lids and placed a tray under the leaky bottles, because spills happened. This step reduced odours and risk, and it felt responsible.
Step 13: Create a small “drop zone” for daily clutter
Garage clutter returned when there was no landing place. I added a small shelf or tray for keys, gloves, and small items used daily. I kept it minimal, because too large became messy again. A controlled drop zone prevented random piles from forming.
Step 14: Keep a donation box in the corner
I kept a labelled donation box on a shelf. When something stopped being useful, I placed it there immediately. The box filled slowly and left the house regularly. This habit prevented the garage from becoming a storage museum again.
Step 15: Plan for bikes, scooters, and sports gear intentionally
Sports equipment tended to sprawl. I used wall hooks for bikes or a simple rack. I stored balls, helmets, and pads in a breathable bin. I placed kids’ gear lower so they could put it back, which helped more than lectures ever did.
Step 16: Create a fast inventory for expensive tools
I wrote a short list of high-value tools and stored them in one area. I used a small lockable cabinet when needed. I avoided scattering expensive items across shelves. This step reduced that uneasy feeling of misplacing things.
Step 17: Put frequently used items at eye level
Eye-level storage saves time. I placed daily tools, car cleaning supplies, and commonly used hardware where hands reached easily. Rare items went higher or deeper. The layout stayed intuitive, which made the system feel professional.
Step 18: Use floor tape to protect walking paths
I marked a simple path with floor tape. It reminded me to keep the center clear. The tape also guided where bins should not creep. The garage felt safer and more controlled afterward.
Step 19: Add lighting that made the space usable
Dim garages encouraged avoidance. I added brighter bulbs or simple LED shop lights, and the space felt more welcoming. Better light made cleaning easier and reduced mistakes. The garage felt less like a cave and more like a workroom.
Step 20: Set a maintenance rhythm that stayed realistic
I did a five-minute reset weekly. I returned items to their zones and emptied the donation box when it filled. I reviewed seasonal zones quarterly, because needs changed over time. This small rhythm kept the garage organised without another big overhaul.
H2: Examples / templates / checklist
I used a mini case-style plan for a typical single-car garage. I placed shelving on the back wall, wall hooks on one side, and bike storage on the other side, leaving the center open for parking and walking. I stored seasonal bins overhead and kept daily tools near the door. My checklist stayed short and repeatable: sweep monthly, reset weekly, review zones quarterly, and donate regularly. I also kept one empty shelf for overflow, because perfection never lasted, and that buffer saved the system.
H2: Mistakes to avoid
I made mistakes that taught me quickly. I bought bins before sorting, and half of them did not fit my actual categories. I placed heavy items too high once, and it felt unsafe the moment I reached up. I created a “miscellaneous” zone that grew like weeds, and it sabotaged the calm. I also ignored lighting early, and I avoided the garage because it felt gloomy. The fix came from returning to basics: zones, labels, safe storage, and a little space left empty.
H2: FAQs
Professional organisation depended on clear zones
Zones reduced decision fatigue. Items returned to their homes faster. The garage stayed tidy because every object had a purpose and place.
Storage worked best when it matched habits
A perfect layout failed when it ignored daily routines. High-use items needed easy access. Seasonal and rare items could sit deeper, and that was fine.
Maintenance stayed easier than a full reset
Weekly five-minute resets prevented a big mess. Donation habits reduced buildup. The system stayed healthy because it received small attention often.
Trust + Proof Section
I used this approach after moving homes and inheriting years of accumulated garage clutter. The results showed in daily life, not just photos. I found tools quickly, parked without stress, and stopped tripping over stray items. The air smelled cleaner after sweeping and removing old cardboard, and that sensory change felt real. Friends commented that the garage looked “finished,” which surprised me, because it stayed simple. The updated date on the page mattered to me, so the advice stayed practical for modern storage systems and busy schedules.
Conclusion
Organising a garage like a pro came from a clear plan, not expensive products. Sorting by category, zoning by frequency, using vertical storage, and labelling consistently created a reliable system. Safety mattered through every step, especially with heavy items and chemicals. The best next step was clearing one zone, like tools or sports, and building the system gradually. Once the first zone worked, the rest followed with less effort. A calm garage made the whole home feel more under control, and it stayed worth it.